![How to Create a WordPress Website [2020]](https://www.webbizz.org/wp-content/uploads/2019/11/wordpress-1.png)
Get a fresh look for 2020! We will help you to make your site beautifully.
Believe it or not, but knowing how to make a website is one of the more essential skills you should master as a small business owner in this day and age.
Please bear with me! Here’s why:
- If you know how to make a website on your own, you will save a ton of money on web developers and designers.
- This will also allow you to follow the market trends and put new things on your website without needing a programmer’s help.
- You will effectively stay ahead of your competition because, while they have their projects slowed down by the need to consult developers, you will be able to build most things yourself (within reason, of course).
With that being said, the most important piece of the puzzle here is that you can learn how to make a WordPress website and then create something awesome for your business or project all on your own.
Last but not least, the DIY approach (no coding skills required) that we’re presenting here is incredibly budget-friendly. In fact, you can build and run your website for as little as ~$35 annually.
Here’s how to make a website on your own, step by step:
Step 1: Choose WordPress as your website platform
Truth be told, there are many website platforms that you can use when building a new site – Content Management Systems (CMS) is what they’re usually called.
The idea of a CMS is to give you some easy-to-use tools so that you’re able to edit your site’s content without any knowledge of coding. For the most part – from the user’s point of view – those CMS look much like the familiar interfaces at Facebook or Google Docs. You basically create new pages or documents, and then have them published to the web.
But enough with the technicalities! As I said, there are many CMS out there – more than 100, in fact, as listed by Wikipedia.
Luckily, though, picking the best one is simple. There’s only one king on top of the mountain – and it’s WordPress.
WordPress is used on more than 34% of all websites . Again, that’s all websites!
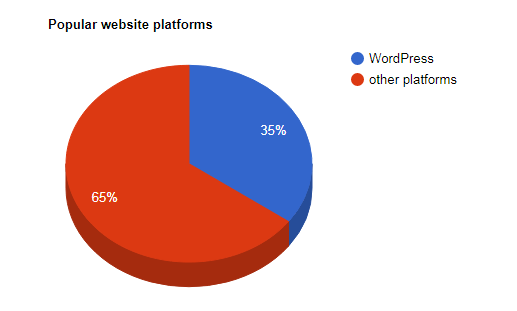
Or, to say it differently, roughly every one in three websites that you visit is built on WordPress.
Here are the key details about WordPress:
- open source
- free
- the ultimate DIY solution for website building
- extra versatile – can run any type of website
- fast, optimized, and secure
- SEO-ready – makes promotion easier
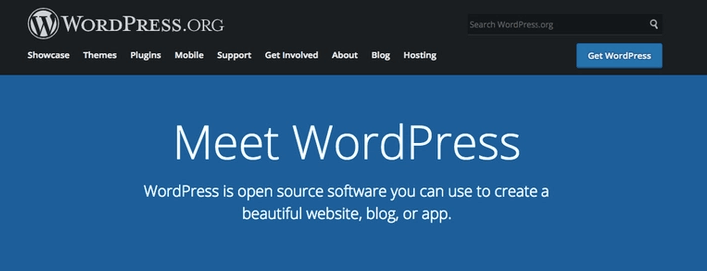
Now, one important distinction; the “WordPress” that we’re talking about here is “WordPress, the software.” You can find it if you go to WordPress.org.
There’s also the other flavor of WordPress – “WordPress, the commercial service,” which you can find if you go to WordPress.com. We describe the differences between the two here.
For now, though, let’s just remember that what we want is at WordPress.org, since it’s a more versatile and cheaper-to-use version of the platform. This will all become clear in the next steps.
There’s no actionable task that you need to do at this point. Step 1 is just about getting yourself familiar with the tool that you’re going to use to build your site in the next steps.
Step 2: Pick a name for your website, buy a domain & hosting
When learning how to make a website, picking a name is probably the most fun aspect of the whole process.
After all, you have complete freedom here. You can pick literally any name you wish for your website.
However! There are still some things you need to understand to set yourself up for success later down the road.
First off, there are nearly 2 billion (!) websites online on the web (at the time of writing). Meaning, staying original can be quite challenging.
It’s a really good idea to construct your website’s name (and thus your domain name) around either the name of your organization (the most obvious approach) or a phrase that’s associated with the niche you’re in, but with some added words for better brand ability.
In short, a good domain name should be:
- brandable – unique sounding, like nothing else that’s out there in the market
- easy to memorize
- short – those are also easier to memorize
- easy to type and hard to mix up – you don’t want people to be wondering how to spell your site’s name
- including niche-related keywords – for instance, if you do anything with pizza, it would be cool to have “pizza” somewhere in the name of the site; it works the same in non-pizza industries as well. 🍕
Here’s a quick tool you can use to find out if the domain name you’re interested in is available:
If you have no idea which domain you want to get then go straight to our no.1 generator – Domain Wheel and see how it can help you.
Start by inputting a seed keyword that defines your website well.
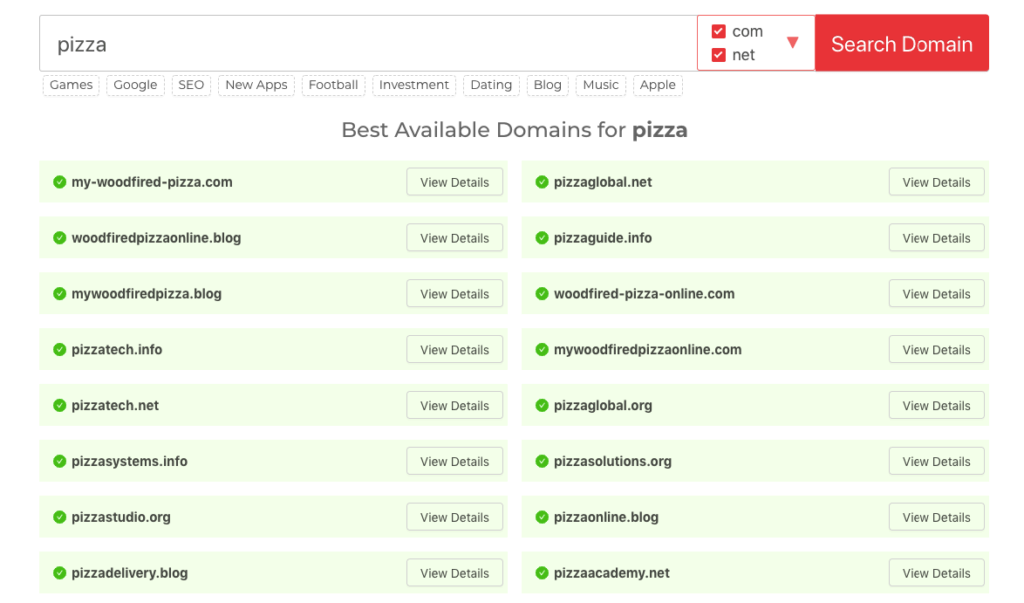
Domain Wheel will come back with some suggestions. You can narrow it down from there to find your perfect domain name.
The next step once you know which domain name you want is to register it and also buy a hosting package in one go.
a) Buying your domain name and hosting
💡 Note. While things like buying a hosting package might sound intimidating at first, there’s really nothing to worry about. The process we’re presenting here is simplified and doesn’t require you to do any technical heavy-lifting.
Beginner’s note: What is hosting anyway?
To say it simply, web hosting (aka. web server) is something that no website can live without. It’s the place where your website sits and waits to be accessed by visitors.
Contrary to popular belief, websites are not “just on the internet” or “on Google.” Instead, they’re housed on web servers – web hosting setups – and then get served to all visitors from there.
To keep your website online, you need to rent out server space from a web hosting company.
This is all much simpler in practice than it sounds, which you’ll see in just a minute.
There are tens if not hundreds of different companies that can register a new domain name for you. Then, there are also tons of companies that can sell you a hosting package…
But let’s not complicate things for ourselves and instead get everything from a single company – and in one go.
We’re going to use Bluehost. Here’s why:
- Bluehost is a reputable web host that’s optimized for WordPress and will make sure that your website operates with no hiccups
- one of the few companies recommended on the official WordPress.org website
- cheap (from $2.95/month)
- easy to use and beginner-friendly
- you get a domain name for free
Here’s what’s going to happen now:
We’re going to
- Bluehost and pick a hosting plan for our website.
- register a domain name with Bluehost as well (the domain is free).
- tell Bluehost to install and configure a clean version of WordPress on our new hosting setup.
- We’ll walk out with a 100% operational WordPress website!
Let’s get started – this is how to make a website:
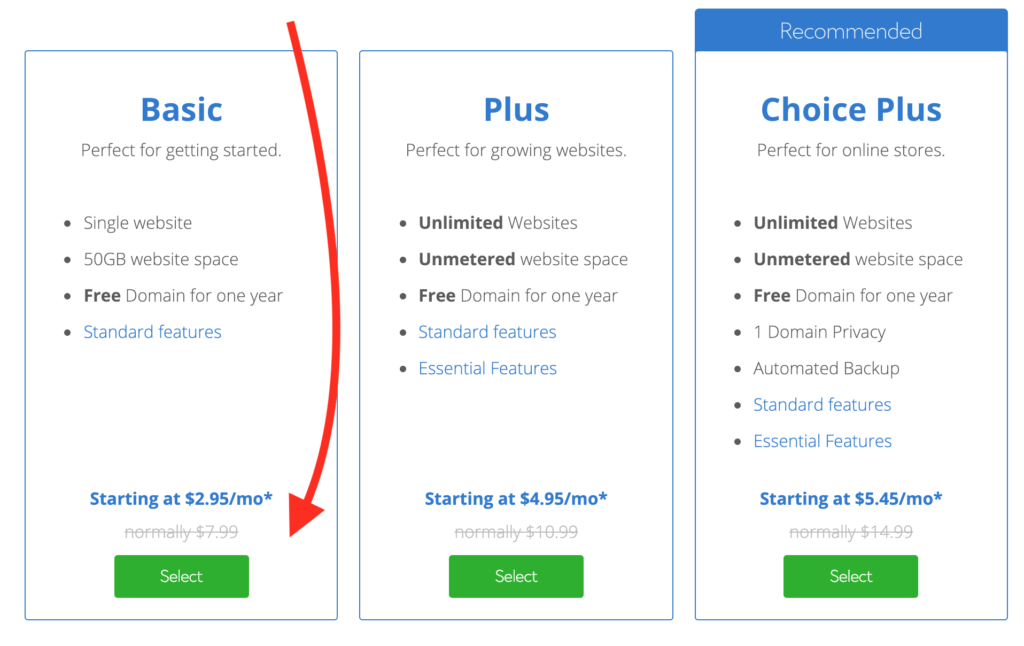
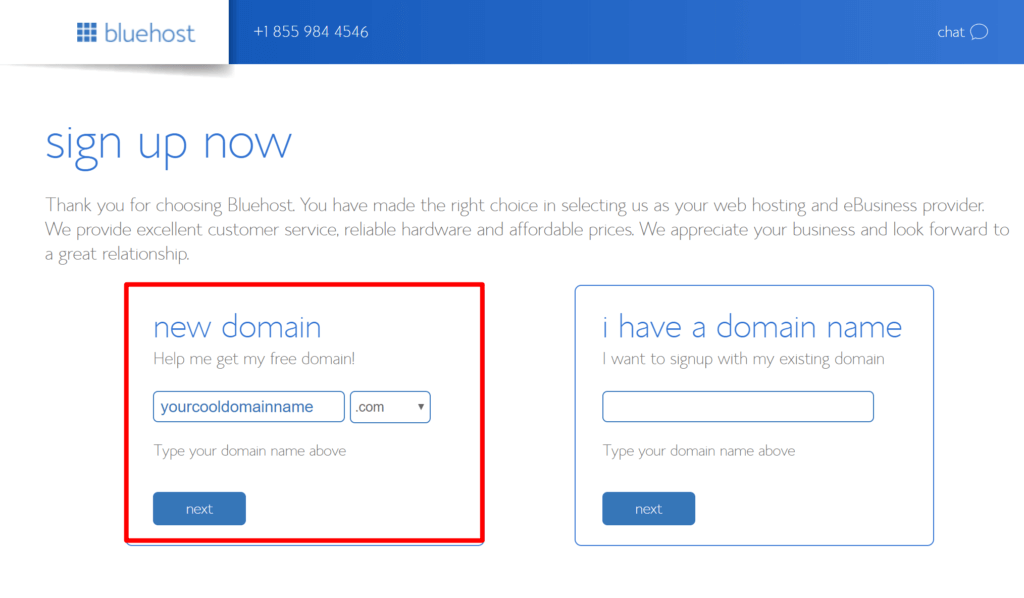
First, click here to go to Bluehost. Once on the page, click on the “Choose Plan” button.
In most cases if you’re launching a new site, the cheapest plan – called Basic – is going to be enough. It’s only $2.95/month.
In the next step, enter the domain name that you’ve decided to get for your site:
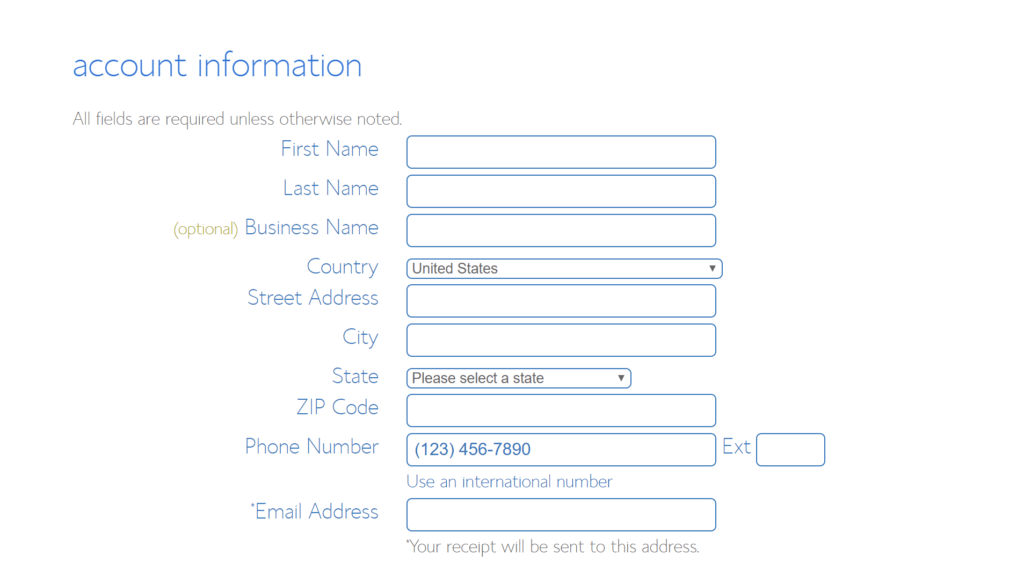
Next, provide your personal data:
Before continuing, it’s good to check and confirm the parameters of the hosting setup that you’ve chosen. This can be found in the section labeled package information:
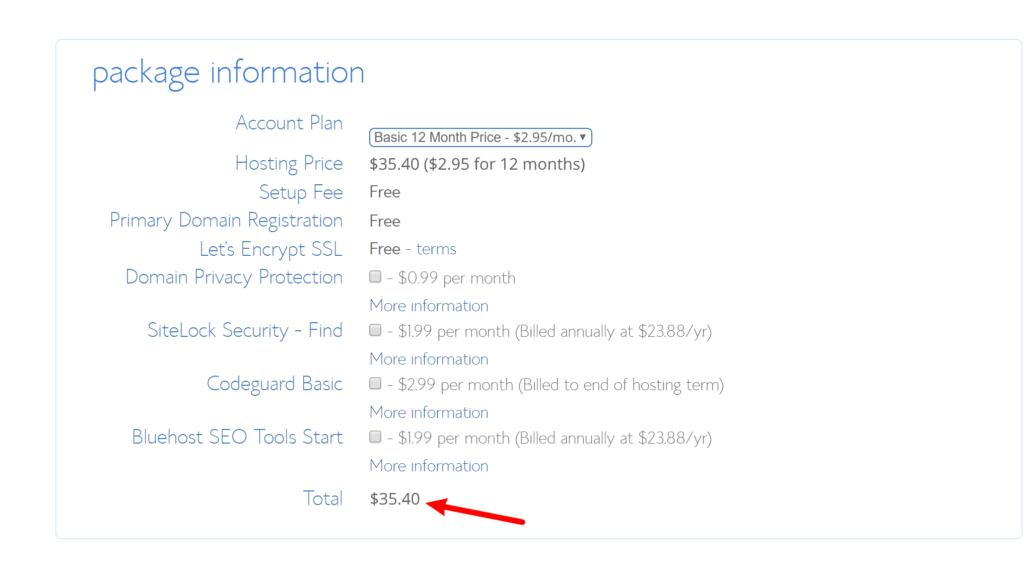
Note; you’ll get the lowest price if you purchase your hosting package for at least 12 months.
At this stage, you can click on “SUBMIT” and finalize your purchase.
b) Telling Bluehost to install WordPress for you
Since you now have signed up to Bluehost and have your hosting setup ready to go, the only element that’s missing is WordPress.
While you technically can install WordPress manually, why would you if you can get other people to do it for you, and for free! Here’s how:
As soon as you completed the sign-up process with Bluehost, you should have received an email from the Bluehost crew with some details on how to log into your customer profile and begin working on your site.
Once you’re logged in, Bluehost will show you an easy to use wizard that takes you through the process of installing WordPress on your hosting setup.
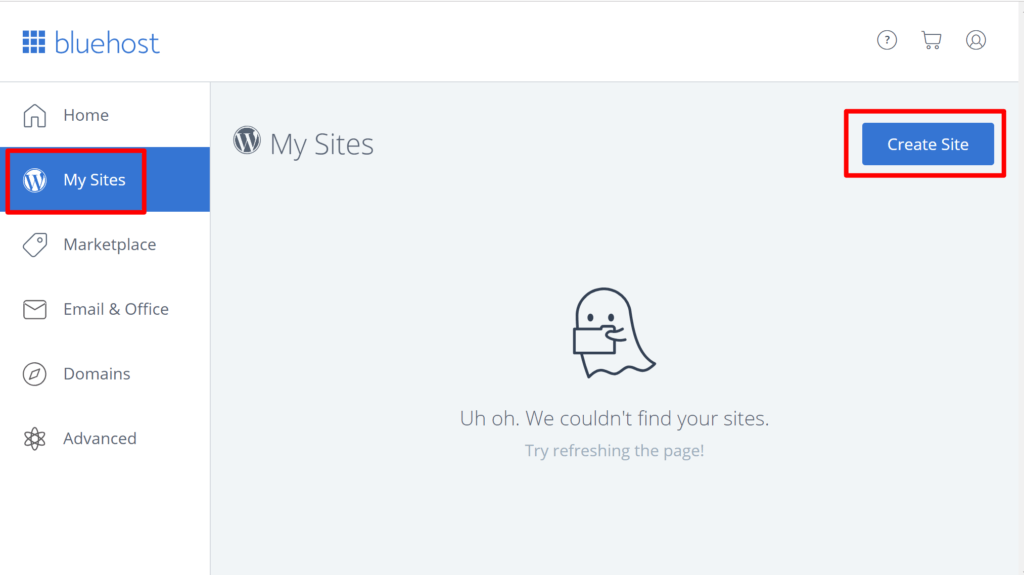
Alternatively, you can also install WordPress by going to the My Sites section and clicking on the Create Site button:
All that Bluehost needs in order to install WordPress for you is the name of your new site and the username/password that you want to use when managing WordPress. Once you’ve completed the wizard, your site is installed and ready to go!
Step 3: Get familiar with the WordPress UI
You can log in to your WordPress user panel if you go to www.YOURDOMAIN.com/wp-admin/
This is what you’ll see:
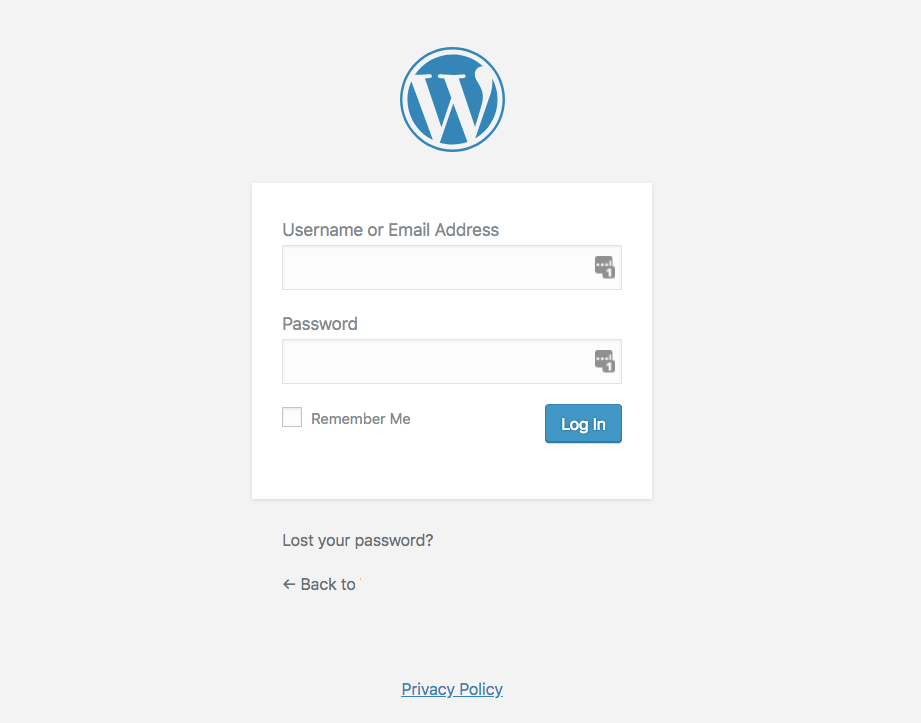
Use the access credentials that you’ve set in Bluehost in the previous step (the “WordPress install screenshot” above).
After logging in successfully, you’ll see the main WordPress interface in all its glory:
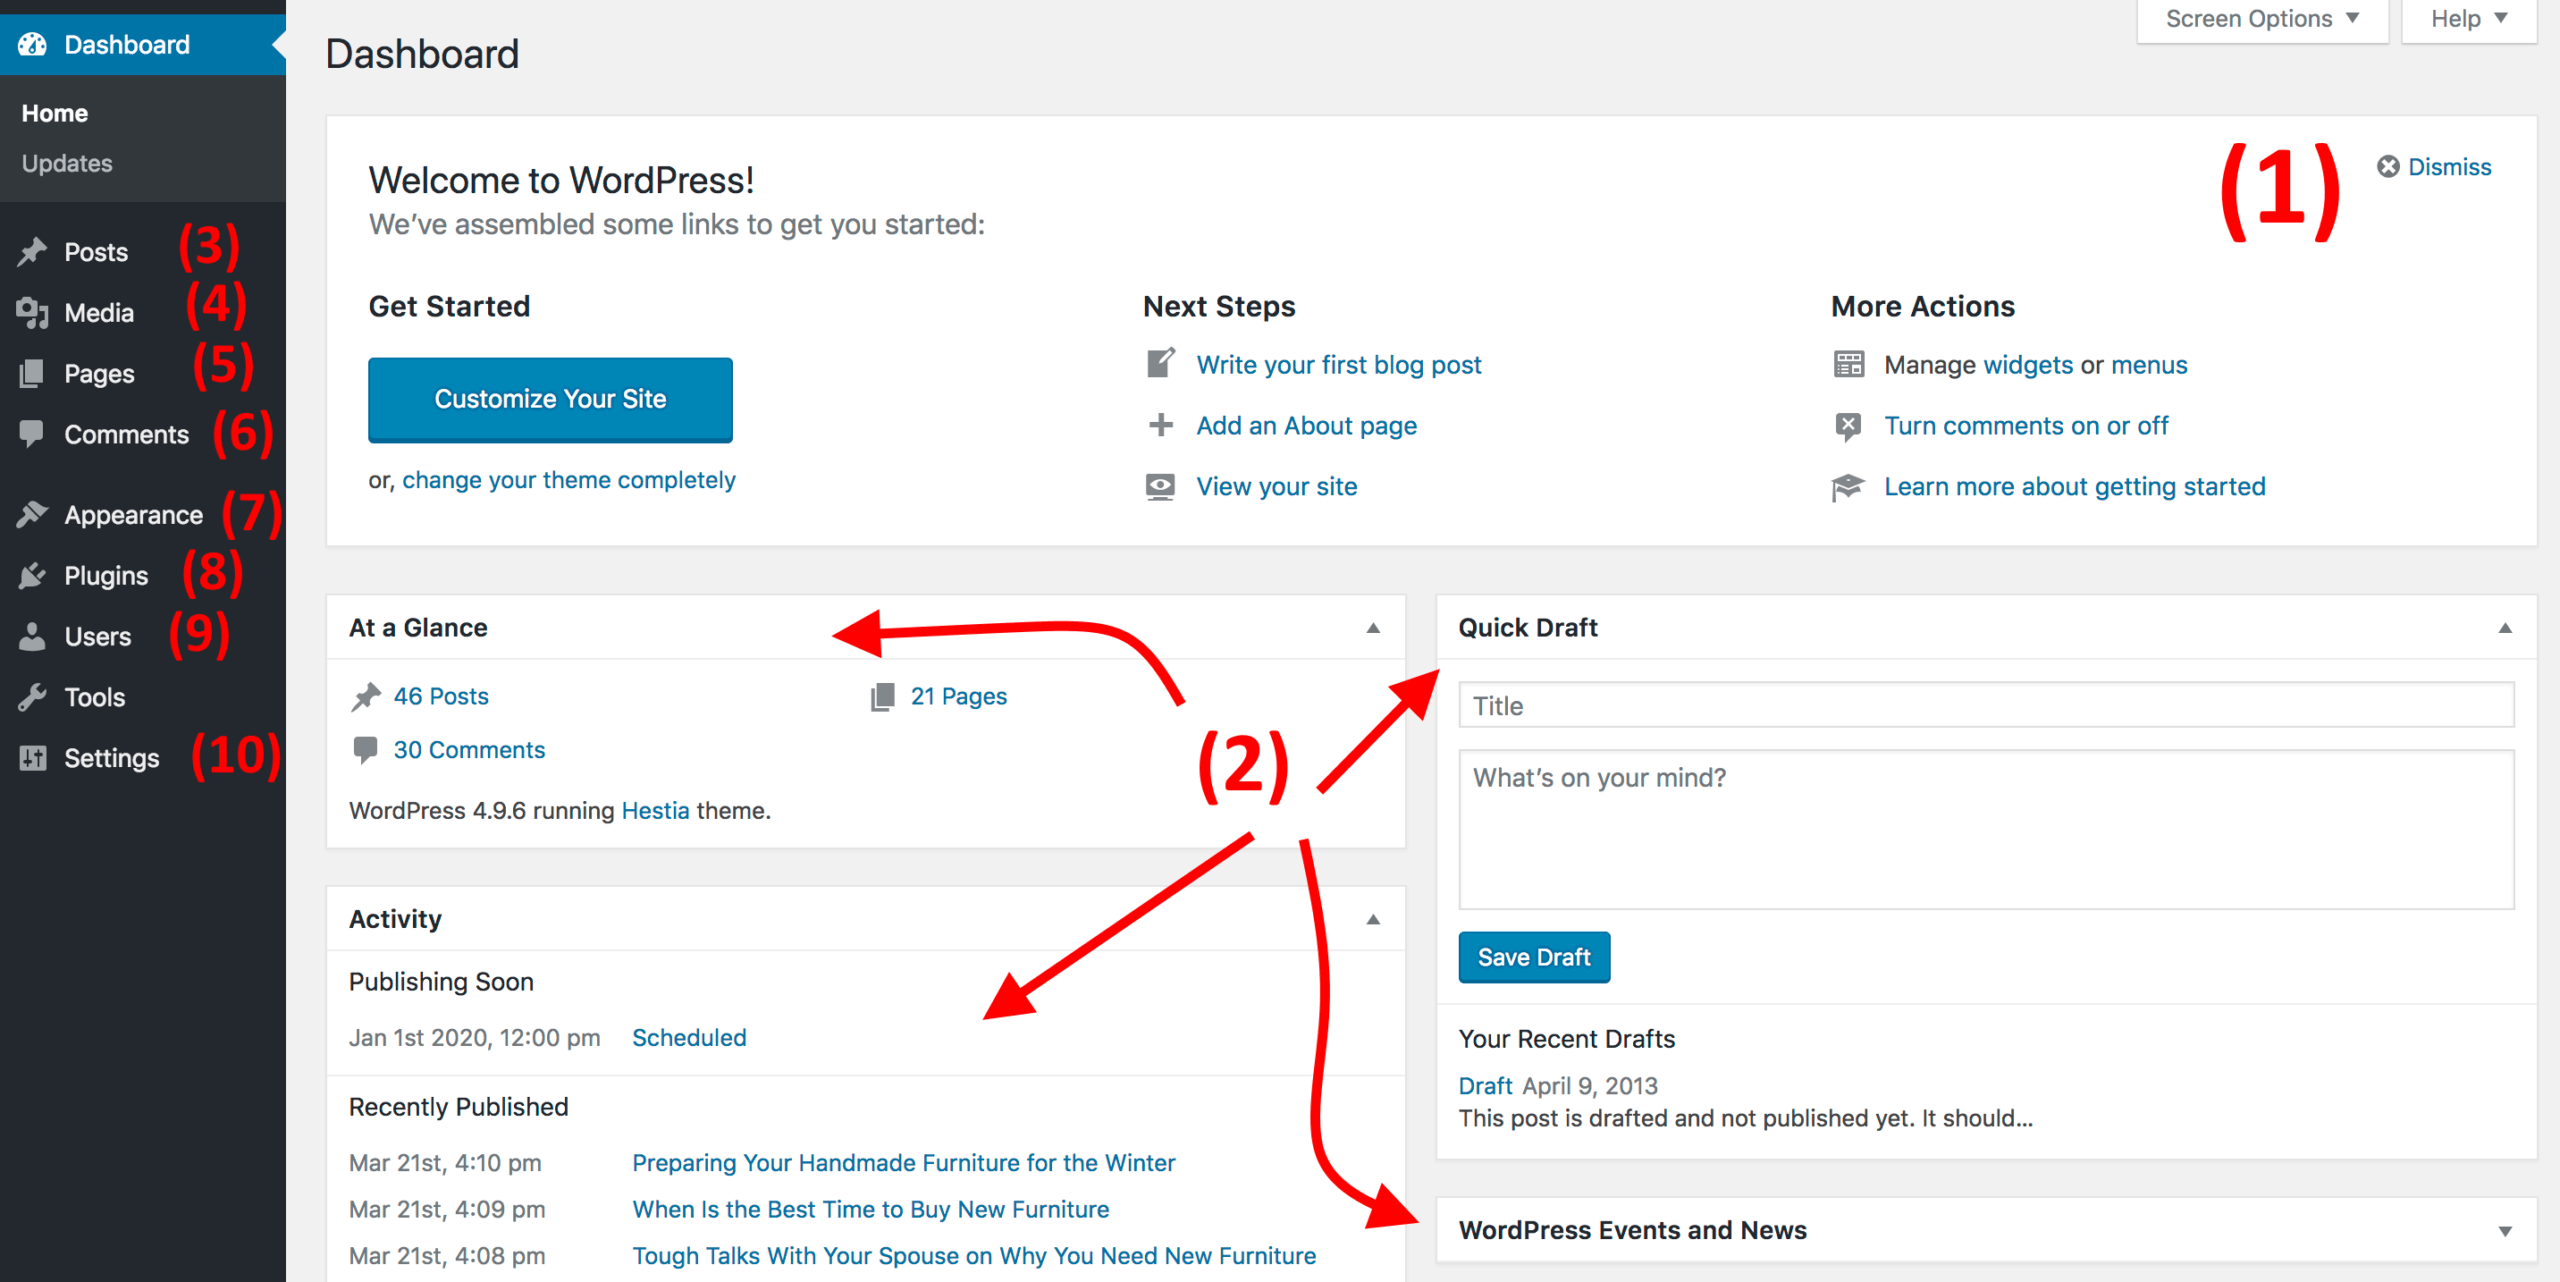
- Welcome message – Some of the most important areas of the admin panel listed as quick shortcuts links – these are usually your shortcuts to how to make a website.
- The current status of your site and what’s going on with it.
- Posts – go here to create blog posts.
- Media – upload/manage images and other media files here.
- Pages – go here to create sub-pages.
- Comments – this is where you can moderate comments.
- Appearance – change your site’s design here and/or customize how certain things are displayed on the current design.
- Plugins – install new plugins here.
- Users – manage user accounts that can access the admin panel of the website.
- Settings – the main settings.
At this stage, it’s good to take care of some basic getting-started WordPress settings that will improve your experience further down the road.
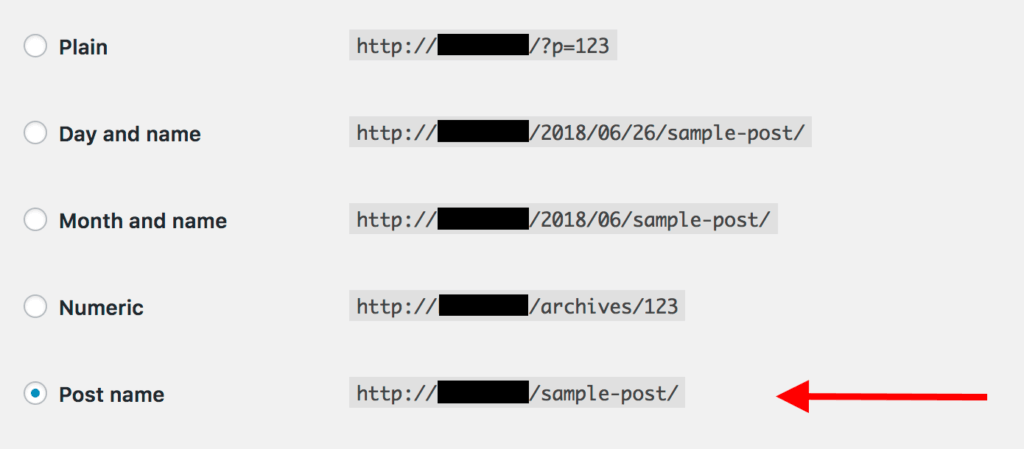
a) Set permalinks
Permalinks define how the individual web page addresses – aka URLs – are structured within your site.
The most optimized structure is to have the page’s title in the URL. For example, your “about” page (more on that page later on) should be available under something as simple as YOURSITE.com/about. Setting the permalinks correctly will allow you to achieve that.
To set your permalinks, go to Settings → Permalinks from the main sidebar in your WP dashboard.
Once there, select this setting:
b) Making your site public
I guess you want Google to be able to find and index your website. To make sure that’s the case, go to Settings → Reading, and make sure that the box labeled “Discourage search engines …” is unchecked.

c) Set your website title and tagline
Go to Settings → General and set the Site Title and Tagline fields to what you want.
Your site title and tagline might appear in various places throughout the site. Some WordPress themes display those on the homepage and in the SEO description – which Google uses when listing your website on the results pages.
The tagline is optional – you can leave it blank if you don’t have a tagline for the site.
d) Allow or disable comments
Whether or not you want to accept comments on your website is up to you.
On the one hand, letting readers leave their opinions and questions under your articles/pages can be great for building a community around the website. But, on the other, you’ll also have your hands busy dealing with spam and making sure that there’s no trolling.
Whether you’ll end up allowing or disabling comments, it can be done in Settings → Discussion.

e) Disable pingbacks and trackbacks
I don’t know why this setting is even still in WordPress. It’s mostly a leftover from back in the day when pingbacks and trackbacks were a thing.
Though, if you want to learn how to make a website in this day and age, you can simply deactivate them by deselecting the following setting in Settings → Discussion.

f) Set your time zone
Setting your time zone correctly will make publishing new pages and posts more predictable.
Generally, you want to set the time zone to either where you’re at or where your target audience is at. Whichever makes more sense.
You can set the time zone in Settings → General.
With the basic settings out of the way, we can get to the fun stuff:
Step 4: Pick a theme / design for your website
The great thing about WordPress is that it works with interchangeable designs – called themes.
Meaning, you can switch the way your WordPress website looks with just one click.
For example, this is what a WordPress website looks by default, right after the installation:
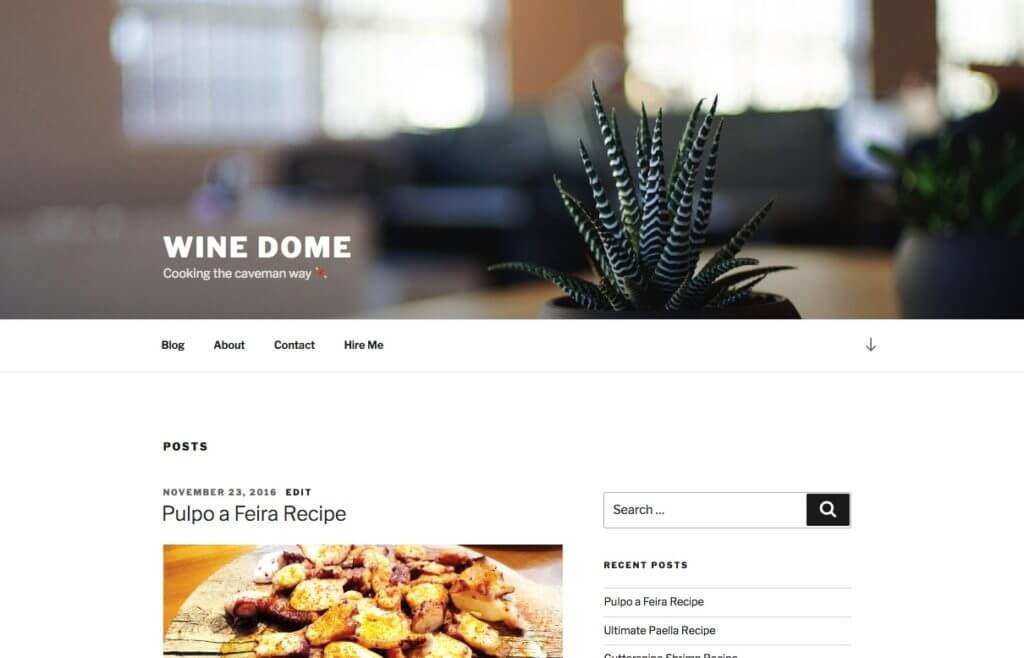
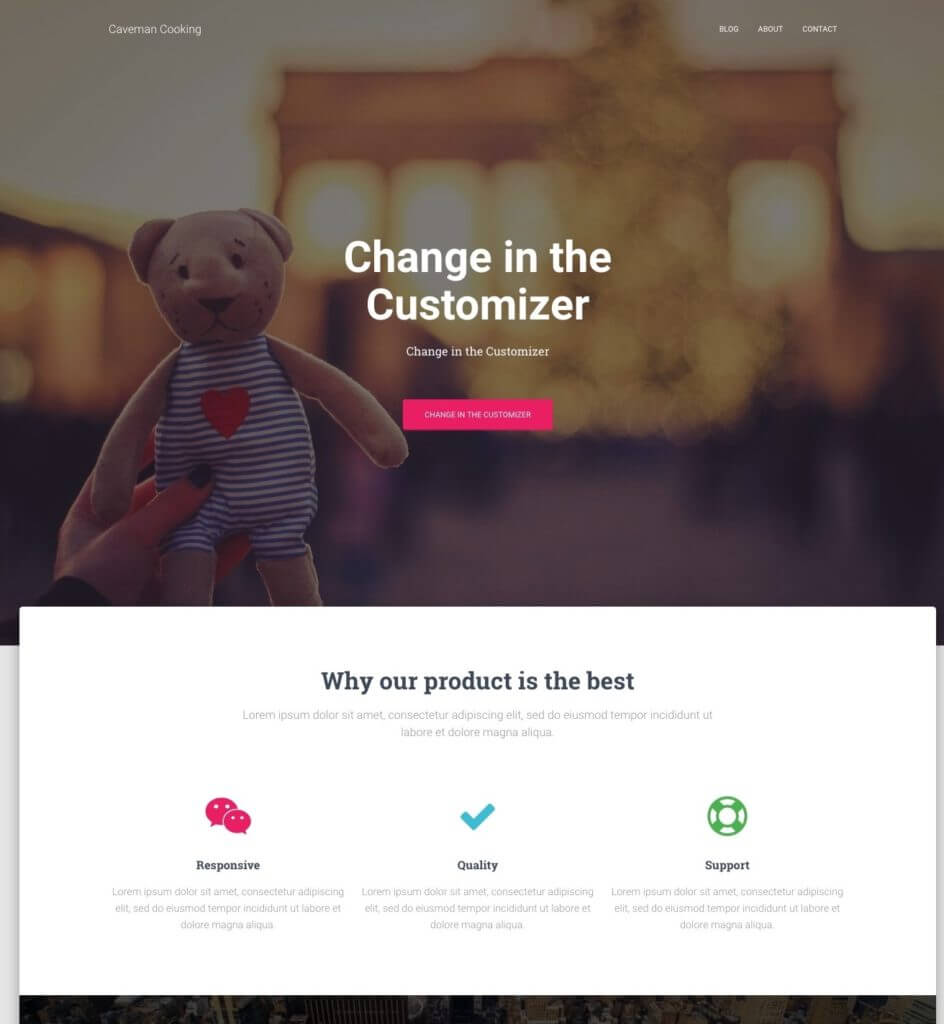
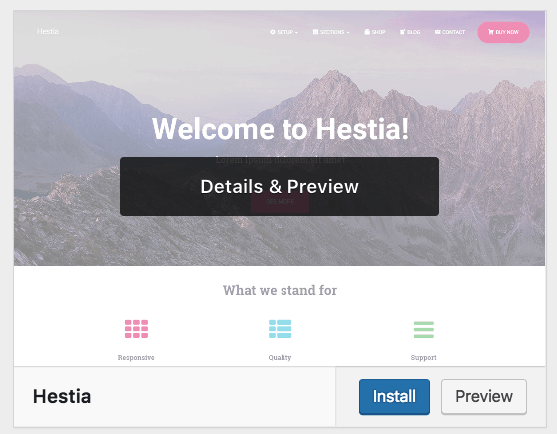
With just a couple of clicks, and with a popular free theme called Hestia, for example, we can get it to look like this:
Here’s how:
a) Pick a theme that you like
As I mentioned, WordPress themes are out-the-box design packages that define the way your website looks. You can install them quickly and then change them in the future if need be.
The critical detail here is that themes don’t change the contents of your site but only alter the presentation.
There’s a huge abundance of WordPress themes out there. Just looking into the official directory at WordPress.org, there are hundreds of themes there.
But that’s just the tip of the iceberg. There are a lot more free themes on the web on third-party sites (like JustFreeThemes), and there’s also a whole other world of paid themes that are distributed by independent theme stores (like ThemeIsle or aThemes) and even theme marketplaces (like ThemeForest).
Even though there are myriads of paid themes out there, for most users, free themes are a great option to start with. The surprising thing about some of the best free themes is how many impressive features they bring to the table without asking for anything in return.
So, how to pick a theme that’s right for you? Here are some tips if you want to give this a more in-depth look. Generally, though, you don’t need to spend too much time on this and go a simple route instead.
We can do that because the theme you choose today doesn’t have to be your final decision. You can always come back to it later on and change it in a matter of minutes.
Therefore, we’re going to go for a safe bet and use one of the most popular free themes in the market today to demonstrate how WordPress themes work. That theme is the aforementioned Hestia.
🎨 Note. While we will use Hestia as the example in the following section, it’s not the only free theme that you can use. Here’s our collection of theme roundups for multiple purposes, starting from business websites to blogs, travel, food, personal sites, and more. You can use any one of those themes. The procedure is the same.
b) Install your theme
If the theme you’ve chosen is available in the official directory at WordPress.org then the only thing you need in order to install it is the theme’s name. Yep. That’s it.
Here’s how theme installation is done:
Go to Appearance → Themes from your WordPress dashboard and then click on “Add New”.
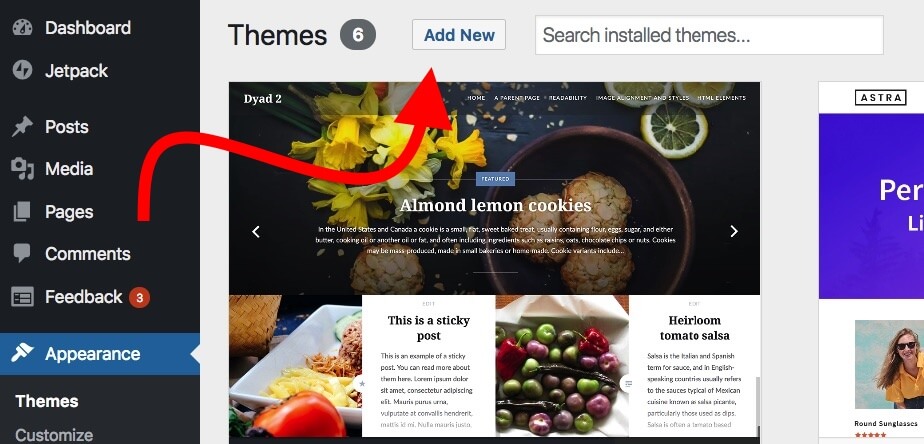
From there, input the name of the theme that you want to install, like so:

You’ll see it displayed on the list below the search field. Just click on the Install button under your desired theme:
After a second, the theme will be installed. To fully enable it on your site, click on the “Activate” button that will appear in place of the “Install” button.
Hestia is one of those themes that offer some excellent onboarding for new users. To see what the theme has in store for you, click on the button from the welcome prompt.

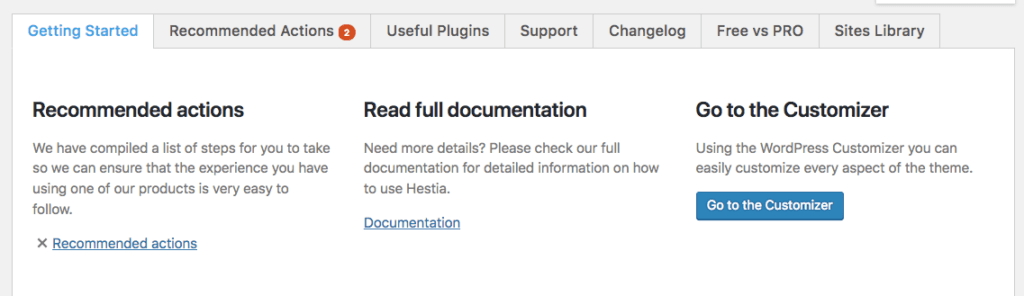
You’ll see your main Hestia panel from which you can learn about the theme and extend its out-the-box features with some extras. Let’s do that now.
First, click on the “Recommended Actions” link to see what’s available.

Out of the options proposed there, let’s go with only “Orbit Fox Companion” for now. Just click the “Install and activate” button.
Orbit Fox Companion is a plugin. We’ll talk about WordPress plugins more in depth later in this guide on how to make a website.
Orbit Fox is a nice addition to Hestia as it delivers some cool features to upgrade your site’s looks. For instance, you get some useful new modules for the homepage, a template directory that will be helpful when building your sub-pages (such as “about” or “contact”), and custom menu icons.
At this stage, your new theme is active on your site. You can see it in action simply by going to YOURDOMAIN.com.
Though, what you’re seeing there is far from the theme’s potential. Right now, we’ll take care of adapting the design, menus, and other elements to make the site look exactly like you want it. Here’s how:
c) Customize the theme
While the out-the-box look of your theme might be already quite nice, you should still do some basic customizations to make it fit your needs hand-in-glove.
To begin, go to Appearance → Customize. You’ll see the main WordPress Customizer interface.
From there, you can fine-tune a load of things. We’ll start with the homepage, since it’s the most representative.
Setting up your homepage.
Do the following:
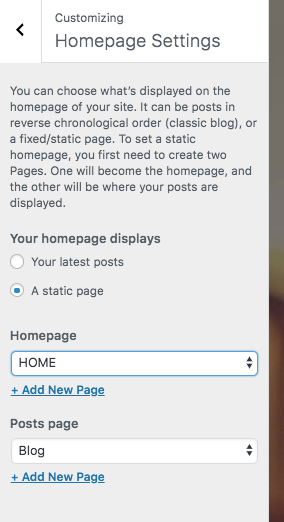
- In the sidebar, go to “Homepage Settings.”
- Select the option, “A static page” under your homepage display setting.
- Click on “Add New,” to create a new page to act as your homepage.
- Input the name for the page – “HOME” seems like a good idea – and click on “Add.”
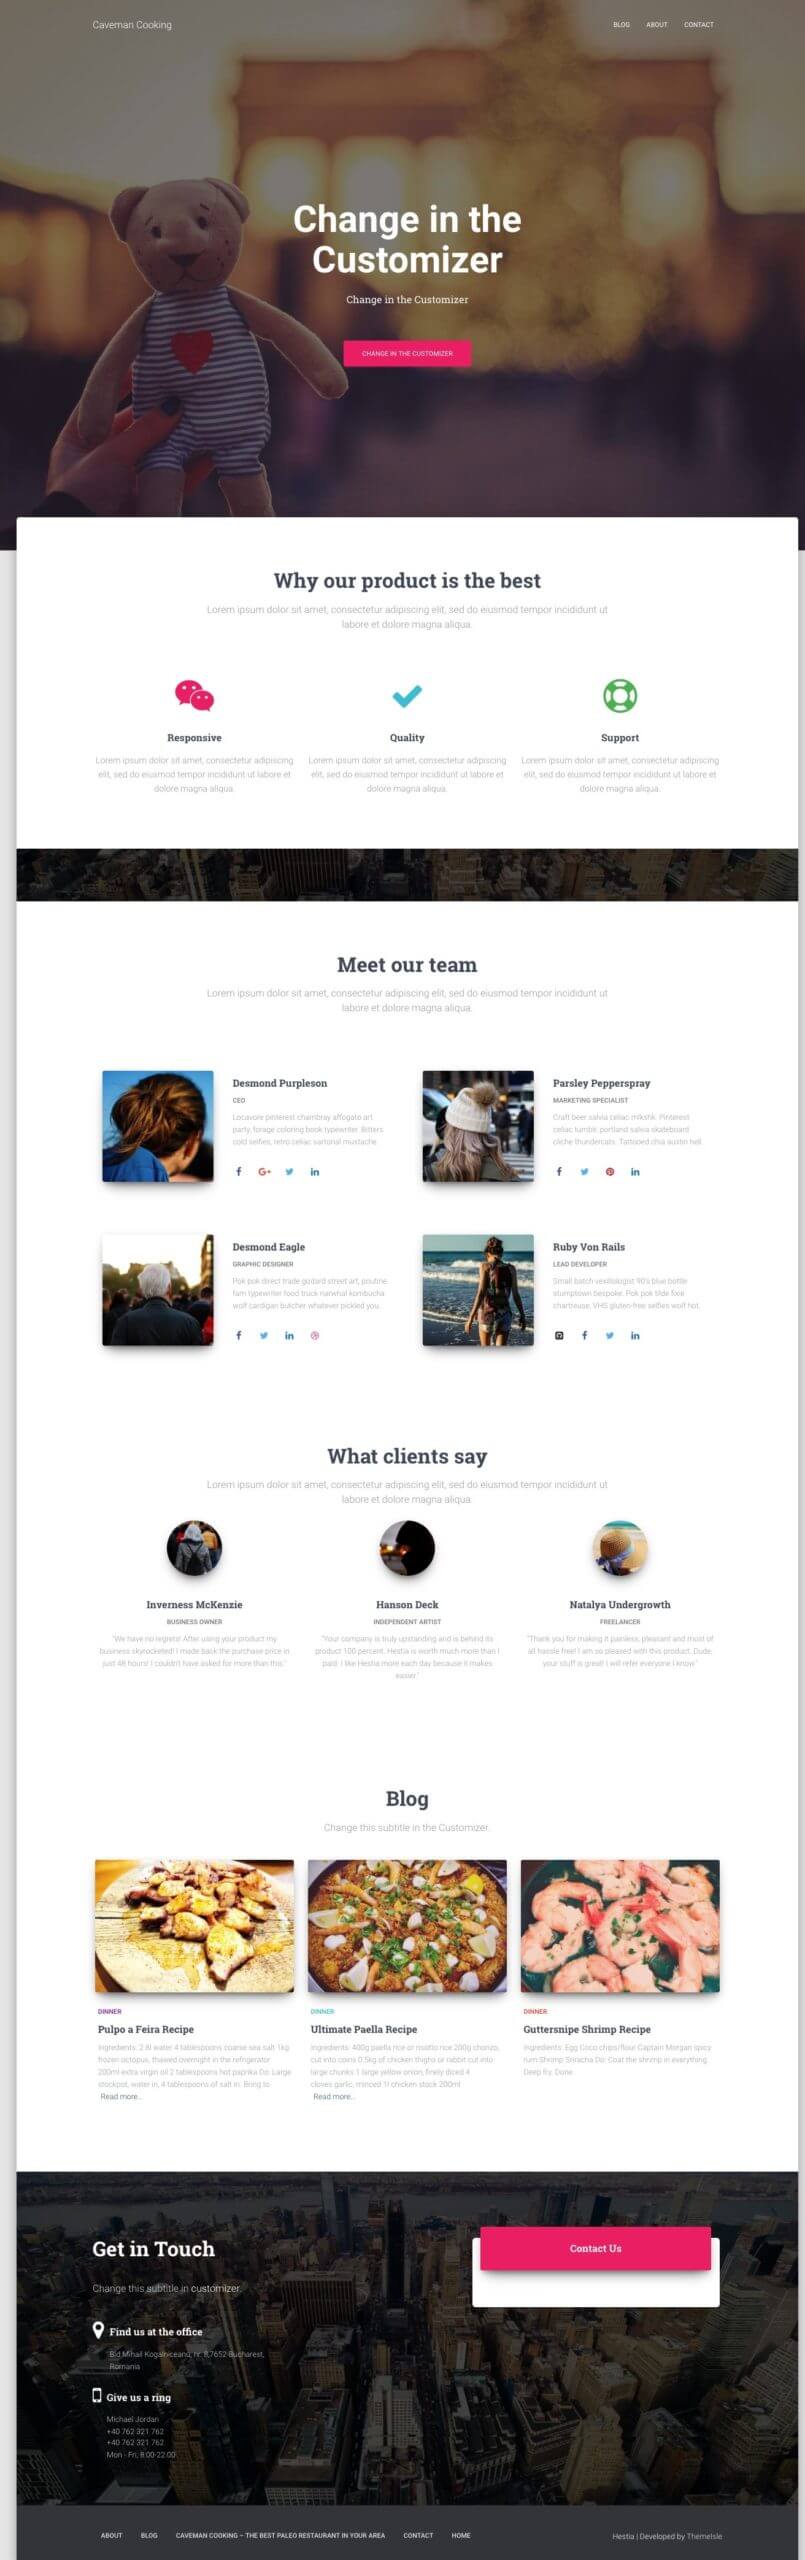
This will replace the default listing of your site’s most recent articles with a completely custom homepage. By default, you’ll see some cool elements on your new homepage.
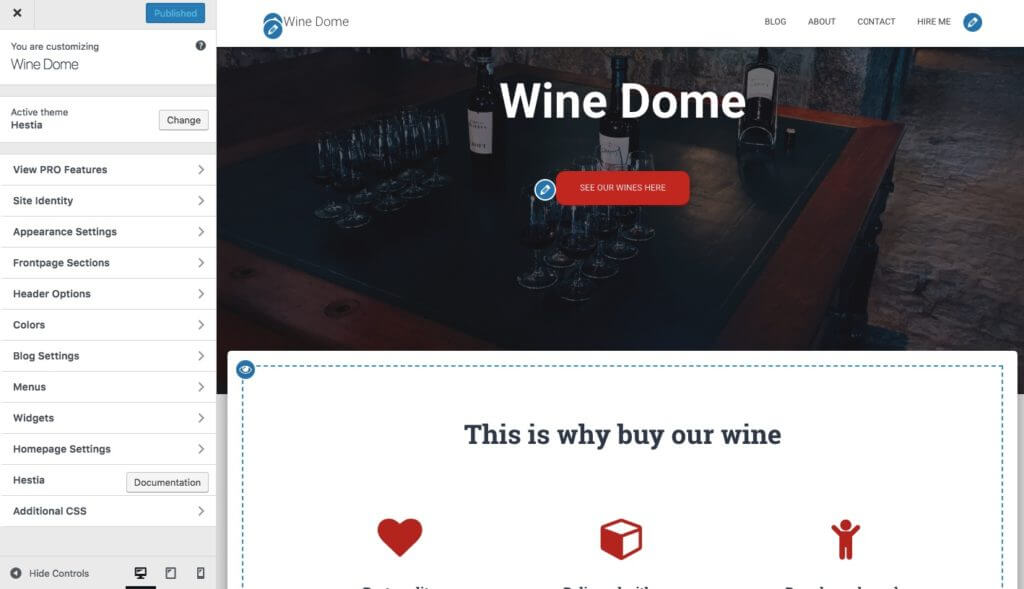
For starters, let’s change the main headline on the page. It’s a good idea to put either the name of your business there or anything else that serves as the title for the entire site.
To make the changes, click on the pencil icon that’s next to the headline.
![]()
When you do so, a customization panel will appear on the left.
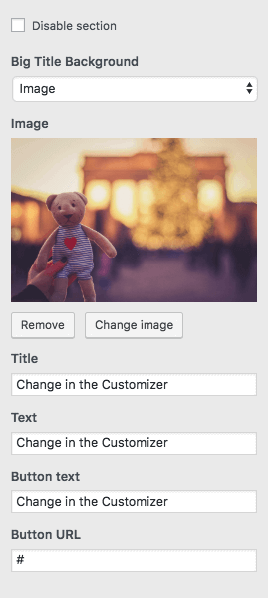
Through it, you can:
- change background image – make it something related to your business
- Also change the title
- replace the text under the title – you can remove this completely if you want to
- change the button text – usually leading to your products or most crucial pages (more on that in a minute)
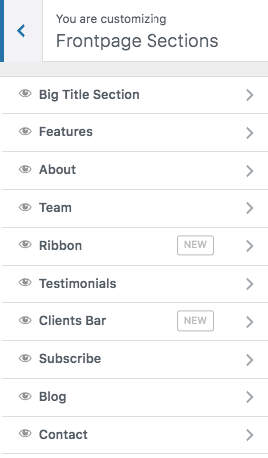
Underneath that, you get to adjust any of the other available homepage blocks. By default, you get all of these (see this list by going to “Frontpage Sections” from the Customizer sidebar):
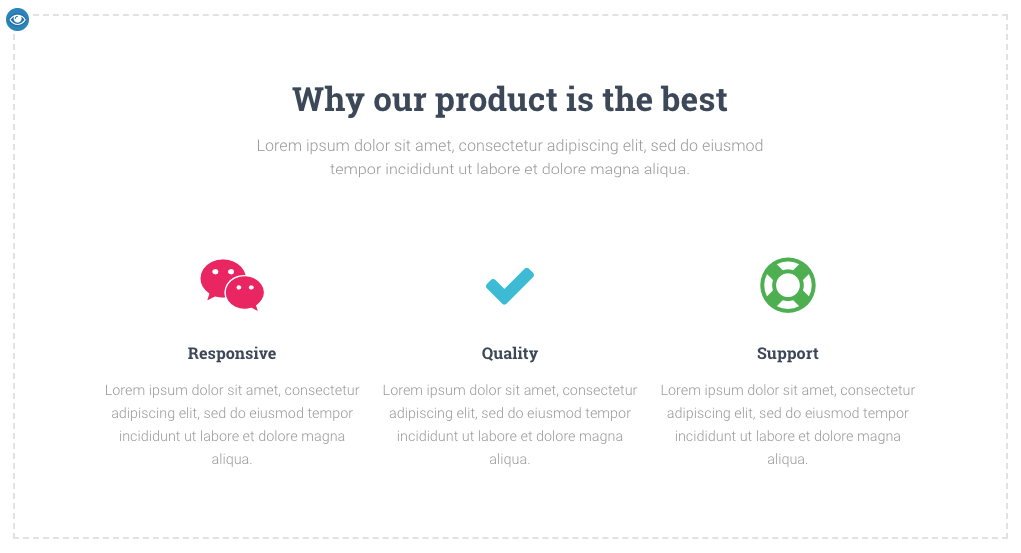
- The Features section is a great place to explain what your company has to offer or what the purpose of the website is – that “purpose” is probably the no.1 thing to keep in mind as you learn how to make a website.
- The About section is a great place to talk about your story.
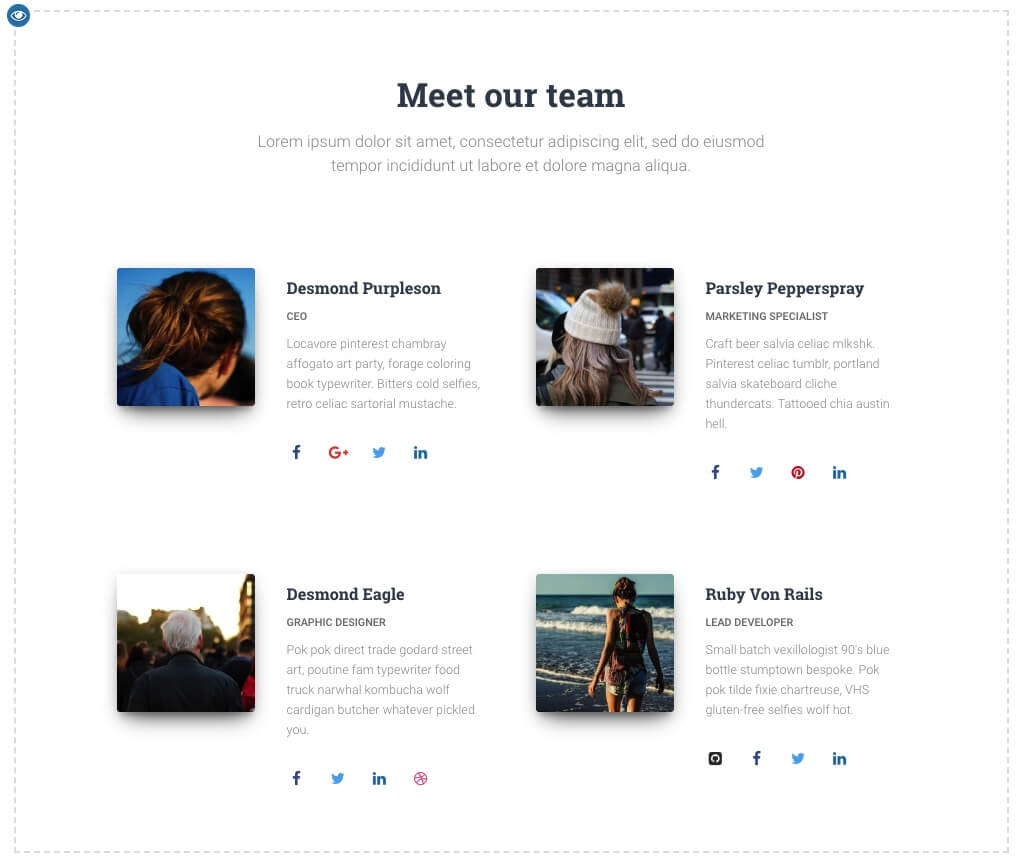
- The Team section you can use if more people work in your business and you’d like to highlight them.
- The Ribbon is another place where you can mention your primary call to action.
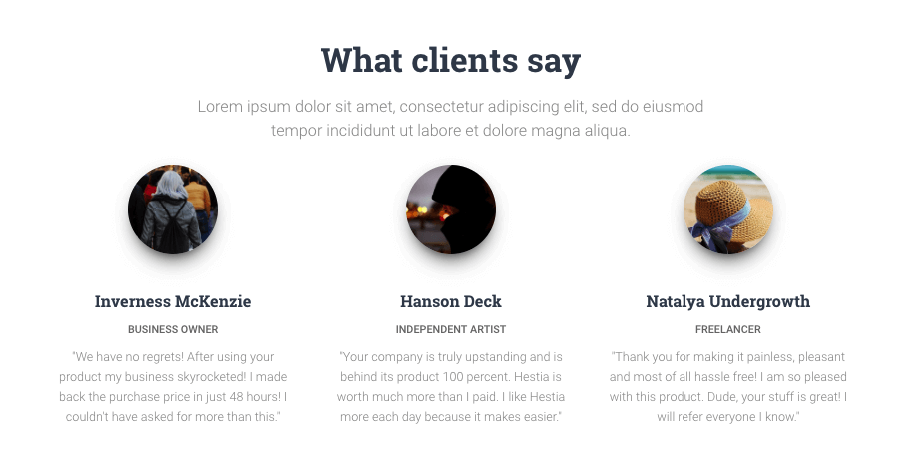
- The Testimonials section is awesome when you want to showcase what your previous customers had to say about your business.
- The Contact section is where you can display your contact information and let people know how to best reach you.
There are also a handful of more sections available. It’s best to browse through those and pick the ones that make sense to use for your business and in your specific situation.
When you’re done adjusting the homepage, don’t forget to click on the main “Publish” button that’s at the top.
Adjusting the typography.
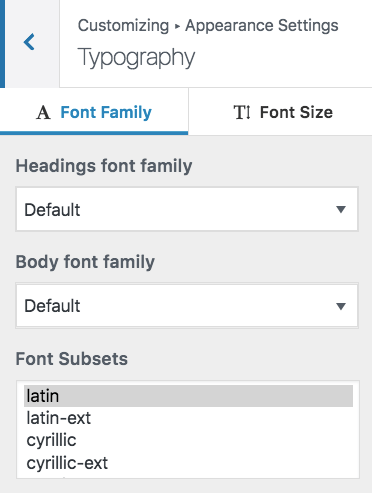
The next thing to do would be to take care of your site’s typography – the fonts used throughout the site.
You can do that by going to Appearance Settings → Typography from the WordPress Customizer sidebar. In there, you will be able to pick a font and see it on your site immediately.
Colors.
Out the box, your new theme is going to use a couple of primary colors that define its default color scheme. You can change that setting in the WordPress Customizer. Just click on Colors in the main sidebar.
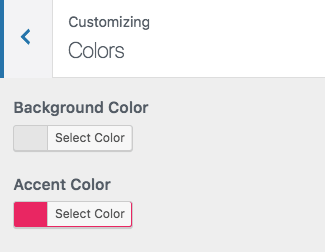
The Accent Color is usually the color used for buttons, links, and everything else that’s meant to stand out from the rest of the site’s design.
…
After doing the above, your website will start feeling like it’s truly yours. You will have made all the necessary tune-ups and customizations to make it fit with your brand.
💡 Note. There are many more settings in the WordPress Customizer to experiment with. For instance, you can:
- pick the default layout of your website – whether you want the sidebar to be on the left, right, or nowhere,
- how you want the blog listing to be displayed,
- whether you want a main background image for the entire site,
- the shape of the buttons, and much more.
Step 5: Get plugins to extend your website’s abilities
Plugins are to your WordPress site what apps are to your iPhone. 📱
In other words, they extend the standard functionality of your site by adding some much-needed features. Essentially, as you’re figuring out how to make a website on your own, plugins are how you can get some great features without knowing any coding.
Here are the plugins you should consider getting – best of all, they are all free:
- Yoast SEO – helps you make search engine optimization tweaks and make your site more accessible to the search engines in general.
- Google Analytics for WordPress – this one integrates your website with the most popular traffic analysis solution on the web.
- Wordfence Security – improves the security of your WordPress site.
- UpdraftPlus – does automatic backups of your website.
- Optimole – optimizes your images.
- WPForms – lets you add interactive contact forms to your website, which your visitors can use to reach you directly – much better than displaying your email in plain text on your site.
- Also look through this list of the most popular WordPress plugins of all time. You might find something interesting there as well.
Installing plugins is simple. If it’s a free plugin that we’re dealing with, then all you need is the plugin’s name.
Go to your WordPress dashboard and then to Plugins → Add New. From there, input the name of the plugin that you want into the search field, and then click on “Install” and “Activate.”
Step 6: Create basic pages
There are some pages that all websites should have, regardless of their purpose or goal.
But first, how to even create a page in the first place:
To do that, simply go to your WordPress dashboard, and then Pages → Add New. You’ll see this screen:
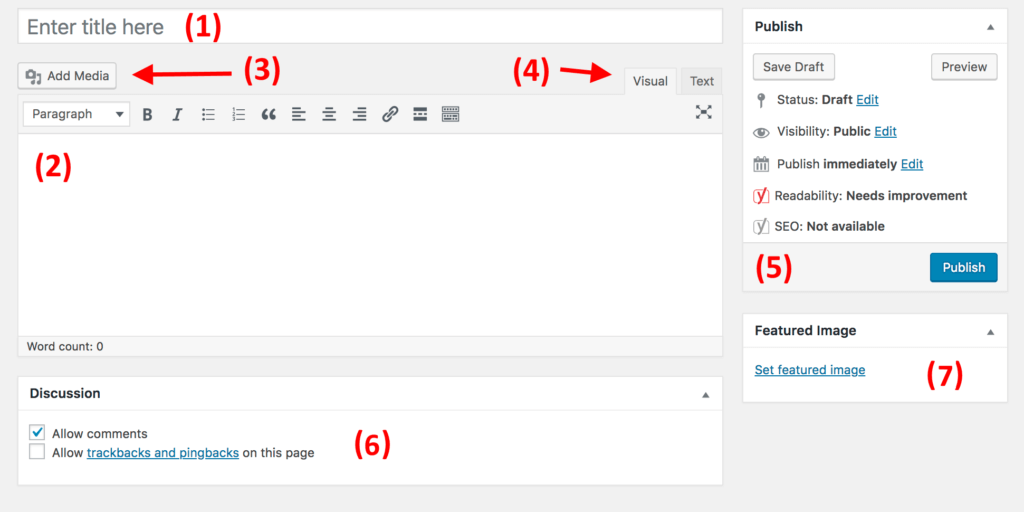
- (1) A place for the headline of the page.
- (2) The body section – the main content of the page. The interface is very similar to MS Word. You get all the basic text formatting features (like bold, italics, aligning text to left/right/center, creating lists, etc.).
- (3) You can add images by clicking this button.
- (4) Switch between the Text and Visual editors. Use the former only if you’re at least vaguely familiar with HTML code.
- (5) The Publish section. This is where the main Publish button is.
- (6) Discussion. Decide whether or not you want to allow comments. The “trackbacks and pingbacks” setting you can leave unchecked.
- (7) Featured image. Most WordPress themes take that featured image and display it somewhere in a prominent spot alongside your page.
When you’re done editing the page’s content, click on “Publish.”
Now, with the how-to out of the way, here are the pages you should consider creating:
- About – I’ve mentioned this a couple of times now since it’s really an important one. Your About page is where you get to tell the story of what your website is and why people should pay attention. This one page is basically a must-have for everyone who wants to learn how to make a website.
- Contact – this is where you can display some contact info along with a nice contact form, through which people can reach you directly (you can get such a form via the aforementioned WPForms plugin).
- Privacy Policy – this page has become a hugely important element on today’s web. Learn more about privacy policy pages in WordPress here.
- Portfolio – a place for you to showcase your past work.
- Store – a crucial thing if you want to sell anything from your site. To make this work, you also need a popular WooCommerce plugin – the best e-commerce solution for WordPress.
Once you’re done with those, you can also check out this list of 12 valuable pages worth having on your site.
Step 7: Consider starting a blog
A blog (as well as marketing through content – aka “content marketing” in general) is among the most effective ways to promote not only your website but also any products that you might want to sell through that website.
And it’s not just me saying this; there’s raw data proving that blogs are a superior tool for marketing online, with 55% of marketers saying that blogging is their top inbound marketing priority.
Running a blog is a straightforward concept. What you do is publish articles related to the topic of your website and do it regularly.
From a technical point of view, WordPress has blogging tools built right into it from the get-go. In fact, WordPress started as a blogging platform.
To create a new blog post, all you need to do is go to Posts → Add New (from your WordPress dashboard).
The process itself of creating a blog post works nearly the same as creating a new page. The editing panel looks nearly the same (the screenshot below), and the options are mostly the same as well.
One of the few differences is that you can also assign your posts to categories and tags.
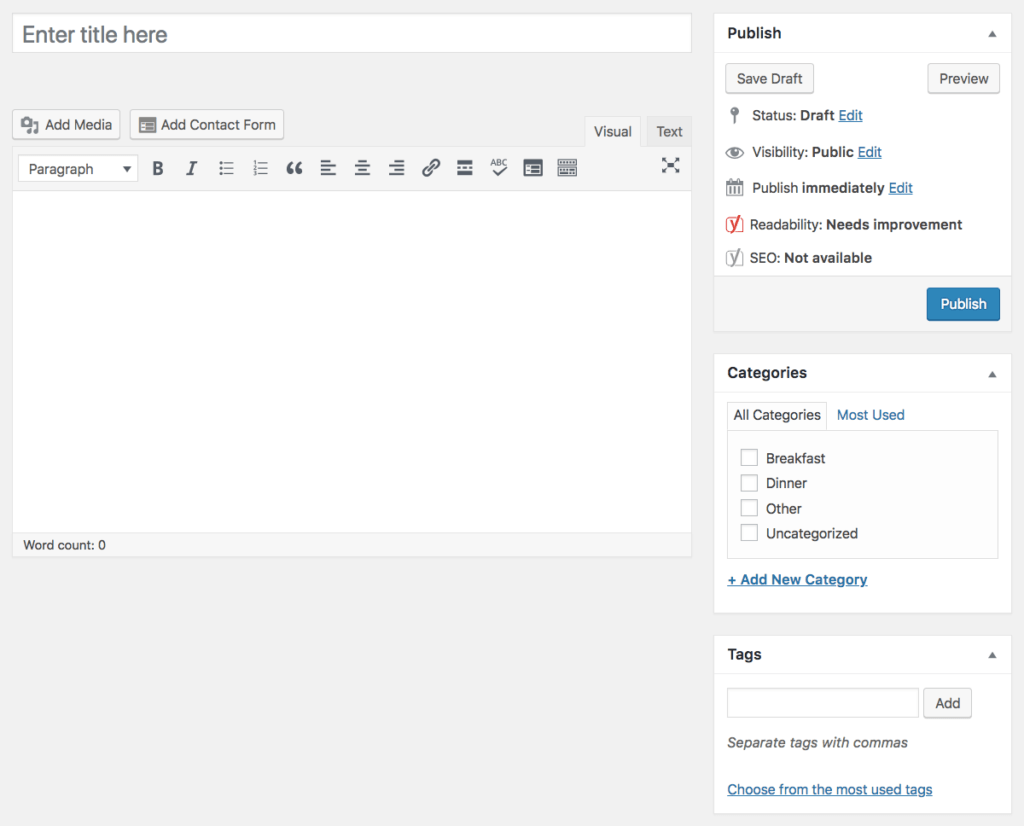
This is what adding a new blog post looks like:
Once you’re done working on a blog post, click on “Publish.”
To make your posts easily accessible, you should designate one of your pages to serve as the main blog listing for the posts.
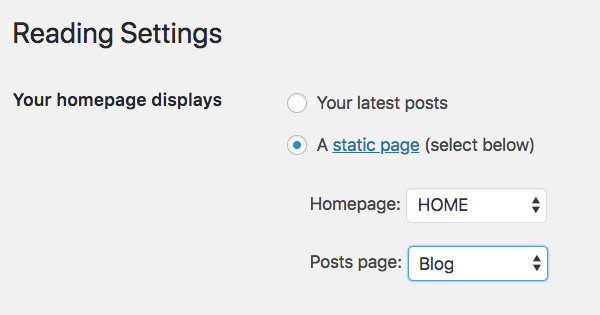
- To do it, first, go to Pages → Add New and create a blank page. Call it “BLOG” – just to make things clear.
- Next, go to Settings → Reading, and select your newly created Blog page as the “Posts page” like so:
At this stage, you can navigate to that new page and see all your recent blog posts there.
Of course, the tough part about starting a blog is to write blog posts regularly and to make them attractive for people to read. Here’s more on how to build a blog that rocks!
Step 8: Adjust your site navigation
With all your key pages online (and perhaps your blog started as well), it’s now a good moment to adjust your site’s navigation and make it overall easier to consume for the visitors.
We’ll focus on two elements here:
a) Menus
Menus are the primary vehicle through which visitors navigate your site, thus they’re crucial when figuring out how to make a website.
Depending on your theme, you will have a couple of options to choose from regarding menu settings. Here’s what you can usually do (on Hestia’s example):
First, go to Appearance → Menus in your WordPress dashboard.
You’ll see this default panel:
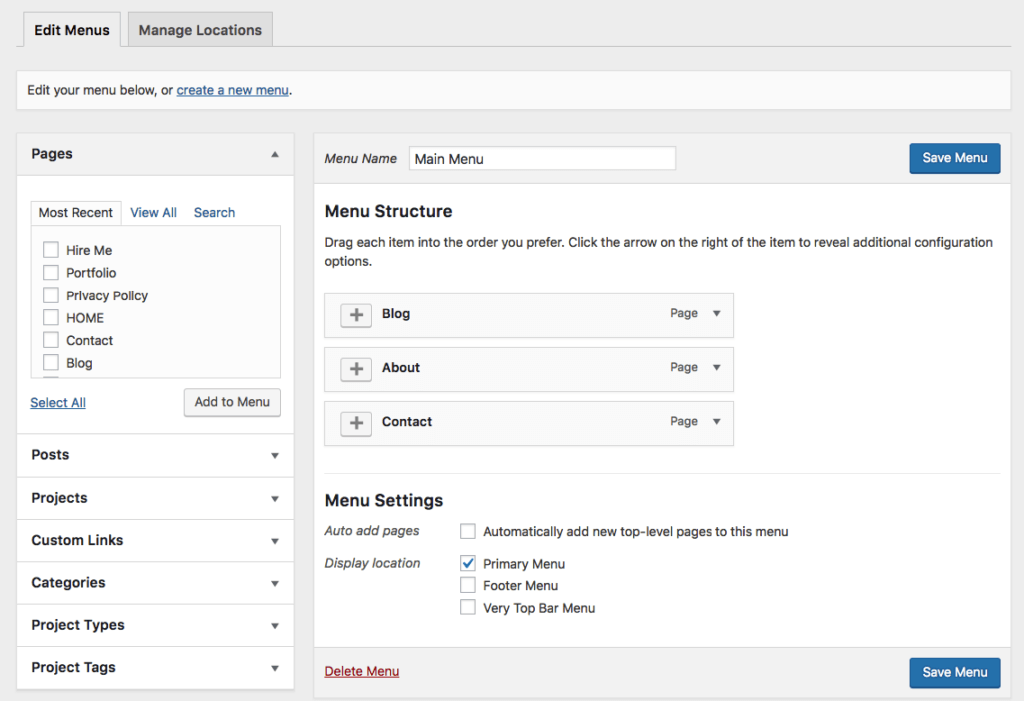
To the left, there are all the pages you can choose to add to a menu. To the right, you can see the menu structure itself and all its settings.
Let’s start by selecting a couple of key pages and adding them to the menu. A good idea is to pick About, Contact, plus whatever other one or two pages you consider to be important, and add them to the menu.
The great thing about this whole panel is that you can drag and drop the menu items to reorder them.
When you’re done, select the menu location at the bottom. Usually, selecting the location labeled “Primary Menu” will result in showing the menu in the top section of the website. This is probably what you want for your main menu. Click on “Save Menu” to save the settings.
💡 Note. You can create additional menus as well. Just click on the “create a new menu” link that’s visible in the screenshot above. This will show you the same menu creation panel. Each menu needs to be displayed in a different location. So, for this new one, you can assign it as the “Footer Menu.”
When you go to your site now, you’ll see the menu in place.
b) Widgets
Widgets are an old-school feature in WordPress. In simple terms, a widget is a small block of content that can be displayed in various places around the website.
The usual placement of those blocks is in the sidebar or the footer of the site.
To see what this might look like and to set your widgets, go to Appearance → Widgets in your WordPress dashboard. You’ll get this screen:
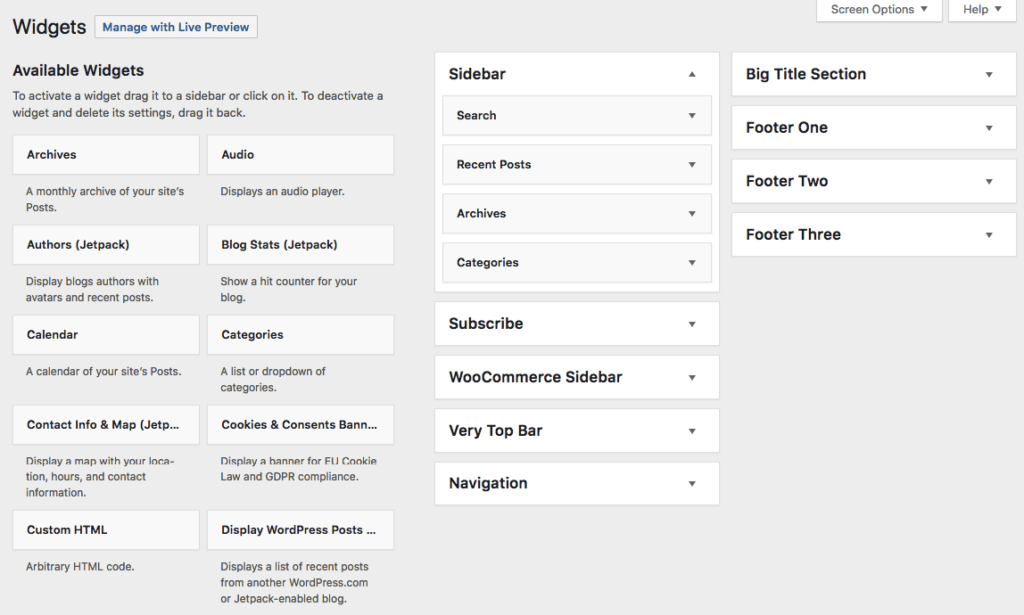
The Hestia theme offers a number of widget areas apart from the sidebar or the footer, but let’s not focus on those additional placements for now.
To add any widget to a widget area, just grab it from the left-hand side and drag-and-drop it onto your chosen widget area on the right.
For instance, as you can see, on my site, I have Search, Recent Posts, Archives, and Categories in my sidebar (screenshot above). Here’s what those widgets look like when I go to my About page, for example:

After you’re done with your widgets and navigation, your site is basically ready for the world to see!